Getting Started · Before your first image
Getting Started with ComfyUI
ComfyUI is a free program for making images with AI. It shows the whole process as a diagram. Each box is called a node and does one job. The lines between the boxes pass the work from one node to the next.
A saved diagram is called a workflow. Every page on this site gives you one that is ready to use. You open it, press Run, and it makes an image.
- You’ll learn
- What ComfyUI is, how to open and run a workflow, how to read its nodes and connections, and how to save your result.
Two ways to generate
ComfyUI can make an image on your own computer or through an online service. Both work on the same canvas.
On your computer
- You download the AI models once. A model is a large file that has learned from a huge number of images. It is the part that makes the picture
- No cost per image
- Needs a graphics card. These workflows were tested on an NVIDIA RTX 3060 with 8 GB of graphics memory, which is called VRAM
- Your photos stay on your computer
In the cloud
- Partner Nodes are nodes that send your request to a company such as Google, OpenAI, ByteDance, Black Forest Labs, xAI or Kling
- Each image uses credits, which you buy in advance inside ComfyUI
- No graphics card needed
- Your photos are sent to that company
Most workflows on this site run on your computer. Two use the cloud: 01B and the second file in 05.
How do I pay for cloud images?
Sign in under Settings → User, then open Settings → Credits and choose Buy. Each cloud node shows its price before you run it. The price depends on the model, the image size and the quality you choose. See the official price list.
Which version of ComfyUI should I install?
- Windows: Comfy Desktop is the simplest. The Portable version also works and is the one shown in the screenshots
- Mac: Comfy Desktop for Apple Silicon. ComfyUI supports these Macs, but the workflows here have not been tested on one
What about the built-in templates?
ComfyUI has a Templates menu with ready-made workflows, such as Flux.2 [Klein] 9B: Text to Image (runs on your computer) and Nano Banana Pro (cloud). They are useful to explore later. The workflows on this site are separate files that you download from each page.
Find your way around
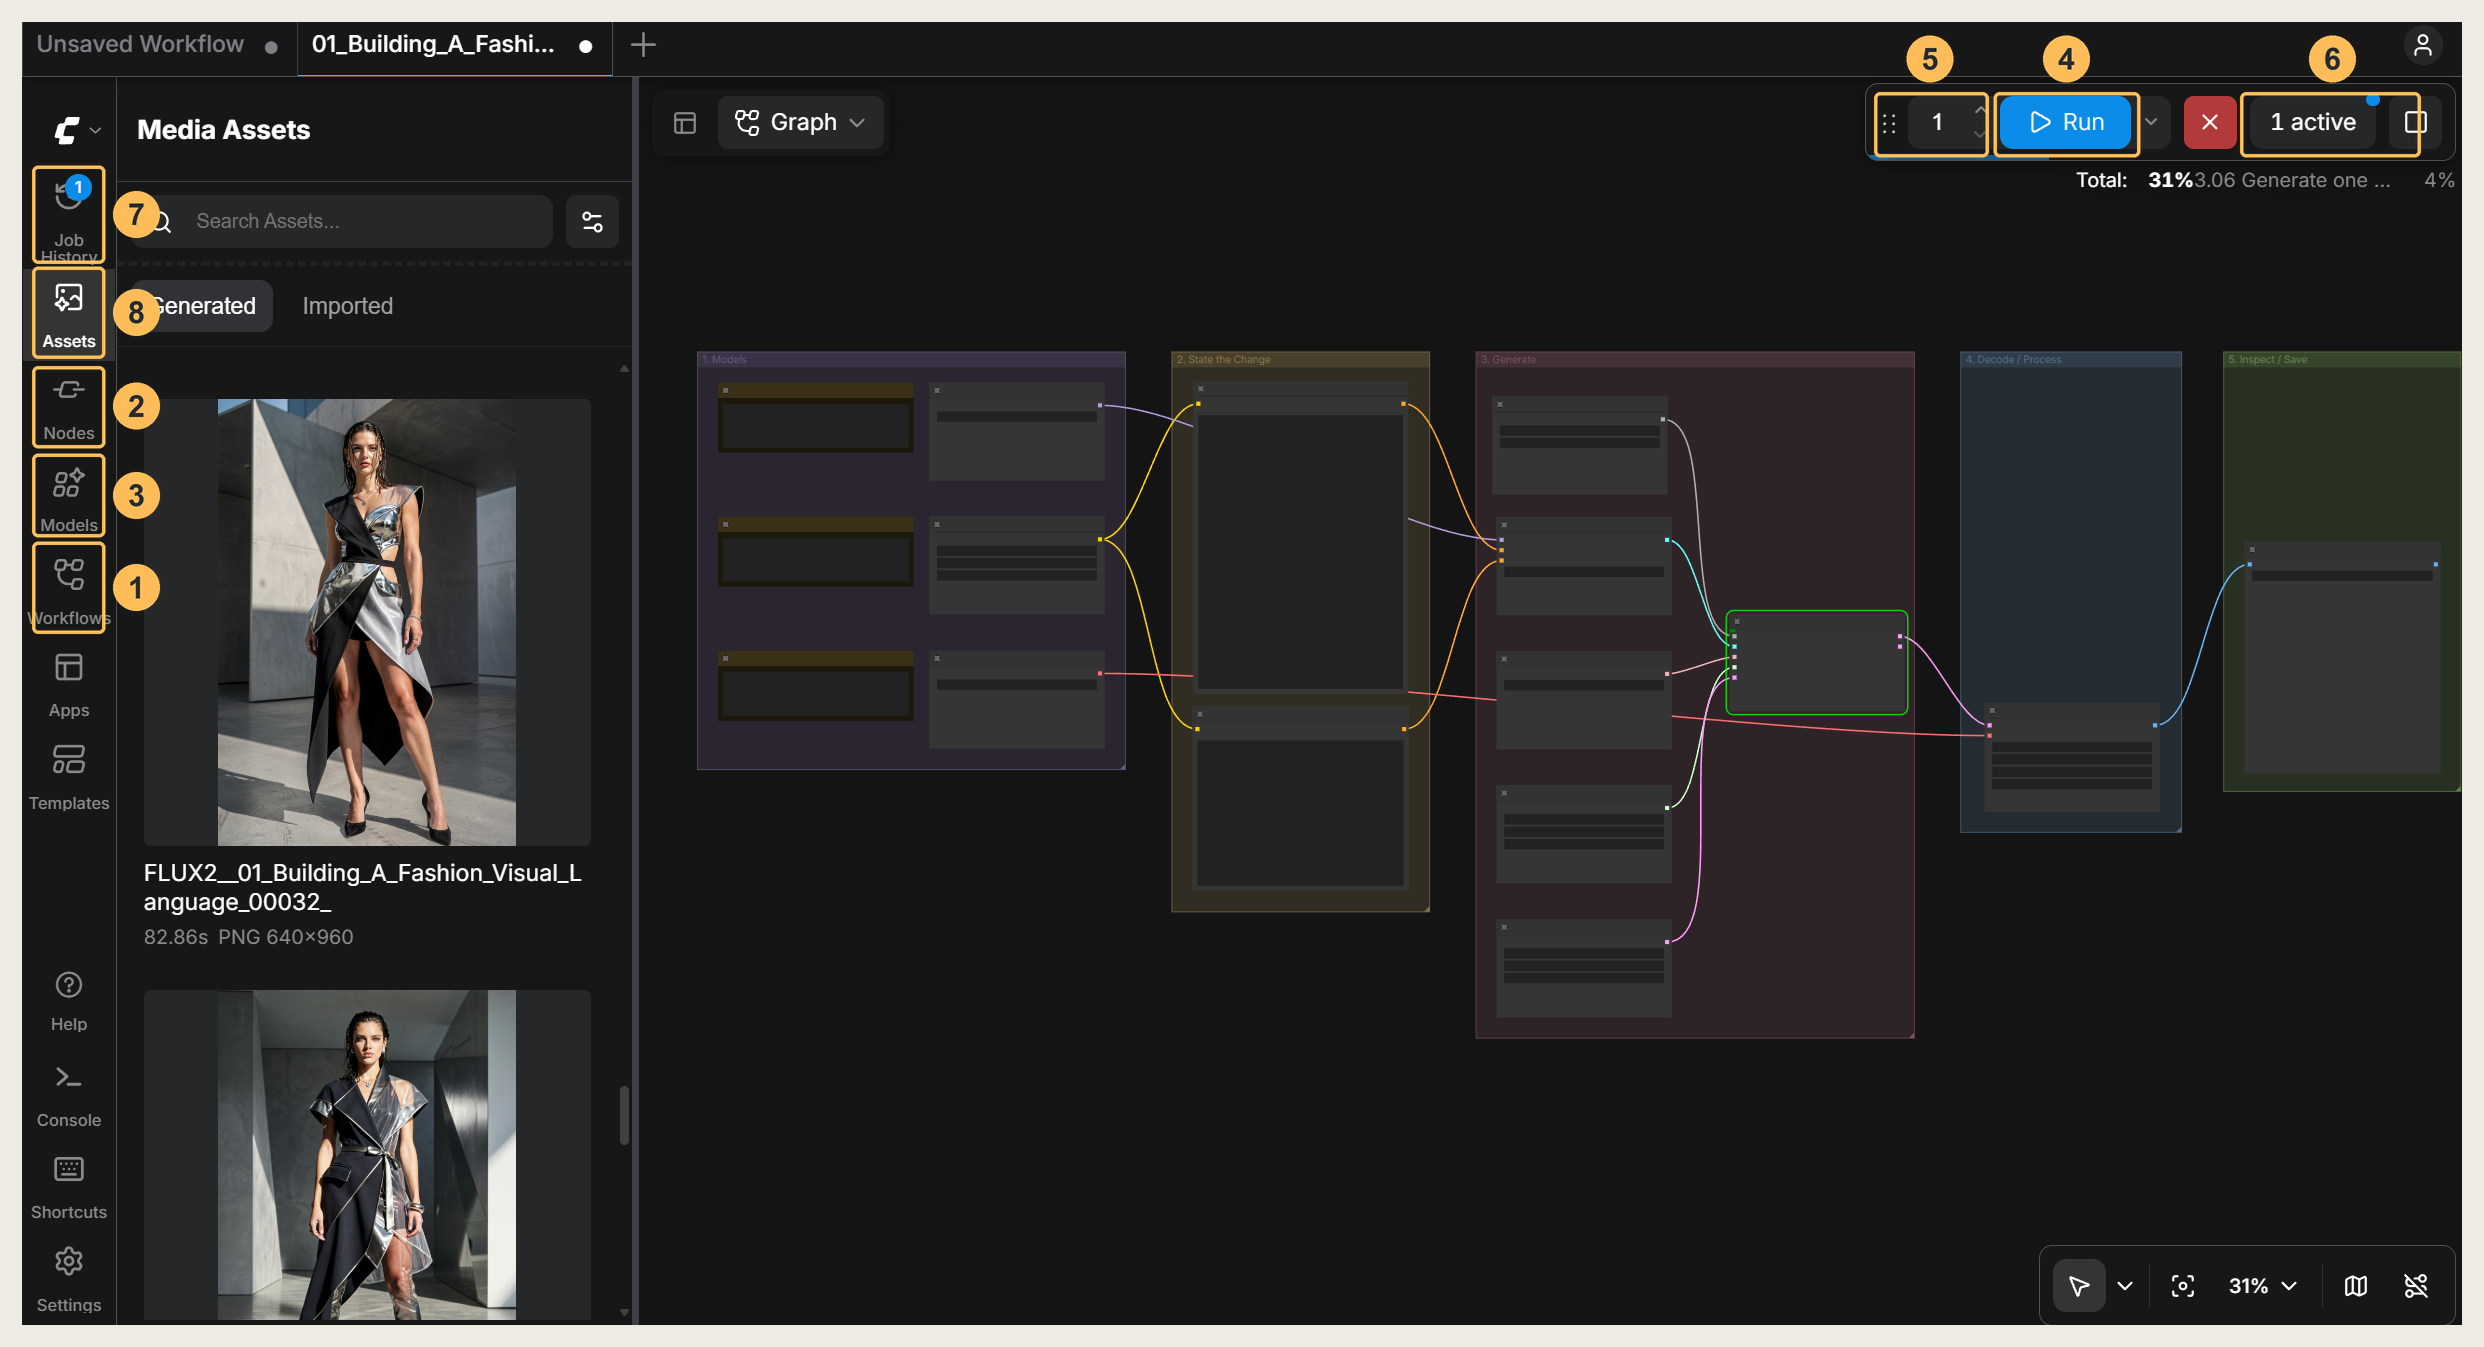
- WorkflowsOpen saved workflows.
- NodesThe library of tools you can add.
- ModelsThe model files ComfyUI can see.
- RunSends the workflow to be processed.
- Repeat countHow many times Run queues the workflow.
- QueueWhat is running now.
- Job HistoryRevisit earlier runs.
- AssetsBrowse the images you’ve made.
Moving around
- Pan: hold Space and drag
- Zoom: mouse wheel
- Move a node: drag its title bar
- Select several: Ctrl-click (Cmd-click on Mac) or Shift-click. Shift-drag moves them together
Nodes, groups and connections
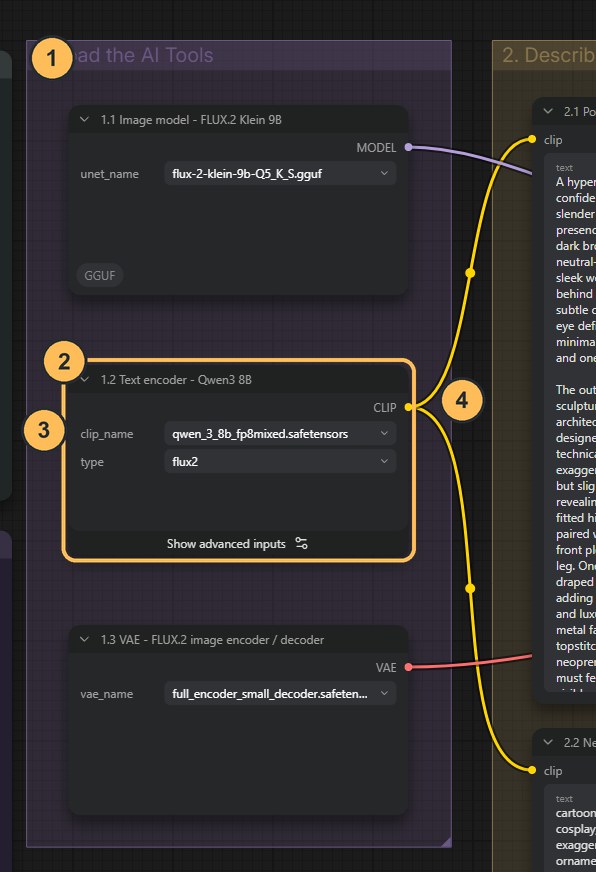
- GroupThe coloured frame. It keeps related nodes together and does not change the image.
- NodeOne tool. Its title says what it does.
- SettingA field inside a node. Here it chooses which model file to load.
- ConnectionThe cable that carries this node’s result to the next node.
Connections run from an output on the right of one node to an input on the left of the next. Only matching types connect.
What each connection carries
Each type has a label and a colour. Read the label on the port first. Themes and extensions can change the colours.
- MODELThe image-generation model
- CLIPThe text encoder, which reads your words
- VAEThe part that turns results into visible pictures
- CONDITIONINGYour instructions, prepared for the model
- LATENTThe image in the model’s internal form, not yet visible
- IMAGEA visible picture
- MASKA selected area
- INT / FLOATA number setting
Make your first run
These steps use 01A, the first workflow.
Download the models
A workflow file does not include the AI models. Download the three shared files listed at the bottom of this page and put each one in its folder. You only do this once.
Open the workflow
Download the
.jsonfile from the workflow’s page and drag it onto the ComfyUI canvas.Fix anything red
Some workflows use nodes that are not part of ComfyUI itself. These add-ons are called custom nodes. A red node means one is missing. Open the Manager, choose Install Missing Custom Nodes, and restart ComfyUI. If a loader says “value not in list”, click the filename and choose your downloaded file.
Press Run
Run it once before changing anything. The first run is slower because the models have to load.
Find your image
The Save Image node shows the result and saves it in the
outputfolder inside your ComfyUI folder.Save the workflow if you changed it
Ctrl+S (Cmd+S on Mac) saves the workflow and its settings. It does not save the picture. The Save Image node does that every time you run.
The two notes in every workflow
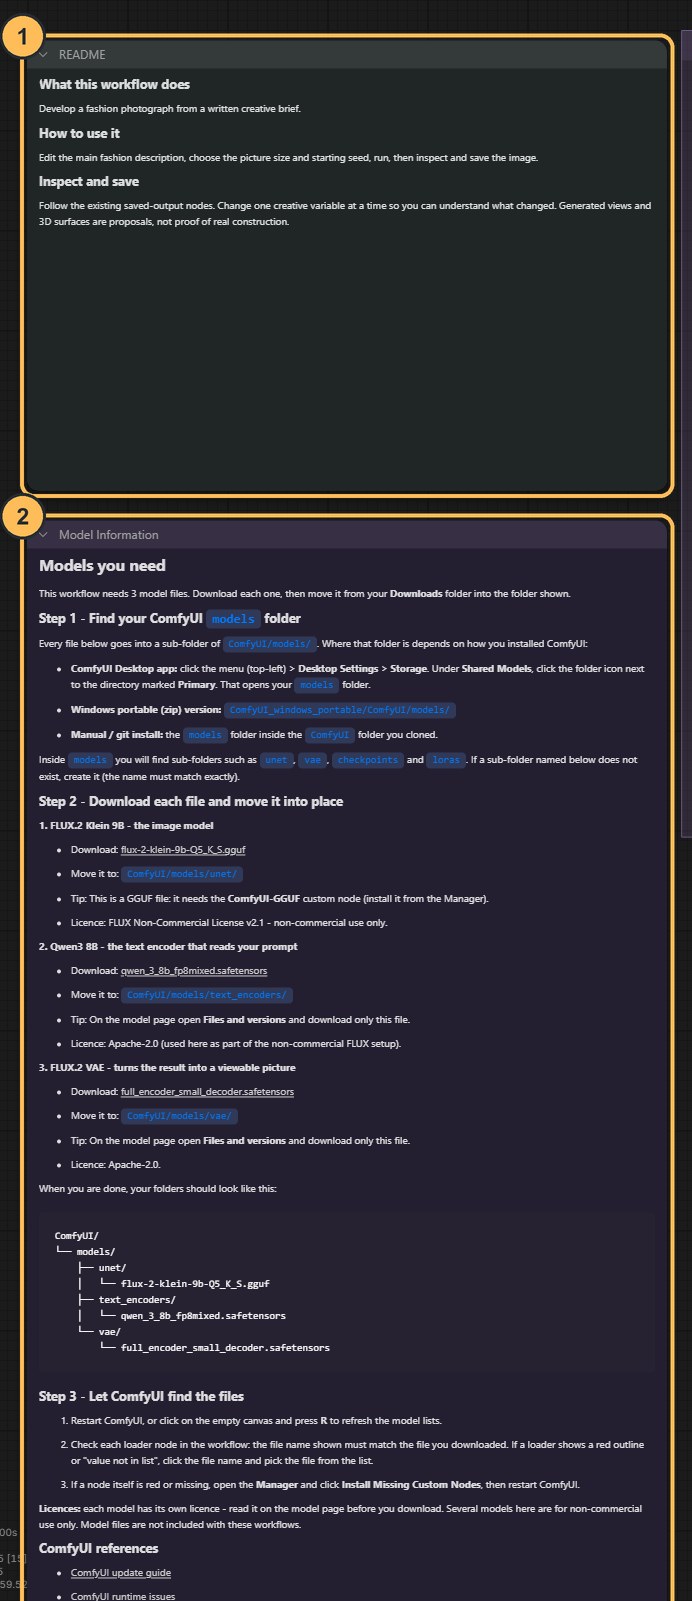
- READMESays what the workflow does and how to use it.
- Model InformationLists the model files to download and the folder for each one.
They sit at the left edge of the canvas. Read them first when you open a workflow that is new to you.
Use it responsibly
Local models do not apply the content rules that online services do. That gives you control over your own work, and it places the judgement with you.
- Consent
- Use a real person’s face or body only with their permission for this specific use. Agreeing to be photographed is not agreeing to be re-dressed, edited or placed in a campaign.
- Deepfakes and misleading images
- Never create or share an image that shows a real person doing or wearing something they did not, or that presents a generated image as a real event or endorsement. In many countries this is a criminal offence.
- Bias
- A model repeats patterns from the images it was trained on. If you leave the person undescribed, you get the model’s habits, not a neutral choice. Describe the person you intend, and review who appears across a whole set of results.
- Rights
- The model’s licence, the rights in your reference images and the rights in the result are separate questions. FLUX.2 Klein 9B is licensed for non-commercial use, and adding a LoRA does not change that. A public image is not automatically free to use.
- Disclosure
- Say when an image is AI-generated, especially when it shows a product. A generated try-on or product view does not prove fit, colour or construction.
- Privacy
- Local workflows keep your images on your computer. Partner Nodes send them to the provider. ComfyUI also stores the workflow and prompt inside every PNG it saves, so check files before you share them.
Model downloads
Everything you need to download for the whole site, in one place. Each file goes in a folder inside models, which is inside your ComfyUI folder. After adding files, restart ComfyUI.
The three shared models
Almost every workflow uses these three files together. Download them once, about 15 GB in total. On each Hugging Face page, click the download arrow next to the filename.
| File | What it does | Used by | Put it in | Download |
|---|---|---|---|---|
flux-2-klein-9b-Q5_K_S.gguf | The image model, FLUX.2 Klein 9B. This is the part that makes the picture | 01A, 01C, 03 to 09 | models/unet/ | Hugging Face FLUX Non-Commercial License |
qwen_3_8b_fp8mixed.safetensors | The text encoder, Qwen3 8B. It reads what you write and passes it to the image model | 01A, 01C, 03 to 09 | models/text_encoders/ | Hugging Face |
full_encoder_small_decoder.safetensors | The VAE. It turns the image model’s result into a picture you can see | 01A, 01C, 03 to 09 | models/vae/ | Hugging Face Apache-2.0 |
Extra models for single workflows
Download these only when you reach the workflow that needs them.
| File | What it does | Used by | Put it in | Download |
|---|---|---|---|---|
dever_blueprint_wireframe_f2k_9b (dvr_wf_style).safetensors | A LoRA: a small add-on file that changes the style. This one adds a blueprint drawing look | 01C only | models/loras/ | Hugging Face The author asks for research and non-commercial use |
RealVisXL_V4.0_Lightning.safetensors | A checkpoint: one file that contains the image model, text encoder and VAE together | 02, 02B | models/checkpoints/ | Hugging Face (open Files and versions and download only this file) CreativeML Open RAIL++-M |
3D model (workflow 10)
This site uses TripoSG to make 3D models.
| Method | What to download | Put it in | How to get it |
|---|---|---|---|
| TripoSG | The 3D model (about 2 GB) | models/3D/TripoSG/ | Nothing to do. The workflow downloads it by itself the first time you run it. Manual source: Hugging Face |
| BiRefNet | birefnet.safetensors, which removes the background from your photos | models/background_removal/ | Download. Create the folder if it does not exist |
Workflow 10 also shows results from three other 3D methods for comparison. You do not need to download them.
Add-ons (custom nodes)
Custom nodes are extra nodes made by other people. You normally do not install these by hand: open the workflow, then use Manager → Install Missing Custom Nodes.
| Add-on | Needed for | Used by |
|---|---|---|
| ComfyUI-GGUF | Loading the FLUX.2 Klein image model | 01A, 01C, 03 to 09 |
| ComfyUI-seamless-tiling | Making a print repeat without visible joins | 02, 02B |
| Comfyroll Custom Nodes | The strength list in 01C and the grid in 02B | 01C, 02B |
| comfyui_controlnet_aux, ComfyUI-OpenPose-Studio, ComfyUI-pose-input-toggle | Finding and editing a pose | 05 |
| ComfyUI-TripoSG | Making a 3D model | 10 |
Each model has its own licence, and several allow non-commercial use only. Read the licence on the model’s page. The two cloud workflows need no downloads, only a Comfy account with credits.