07 · Catalogue views
Garment Product Views
Turn one photograph of an outfit into a clear product presentation: the same garment on a white display mannequin, seen from the front, the side and the back.
Small details such as shoes are the hard part. The workflow uses two techniques to keep them the same in every view: a close-up reference of the shoes, and reusing the finished front view.
- You’ll learn
- How to ask for a presentation without redesigning the garment, why small details need to be named in words as well as shown, and how reusing a generated view as a reference affects consistency.

What goes in, what comes out


How the workflow works
Explained earlier:reference images and written roles (03) · one reference, several branches (06) · seed, guidance and steps
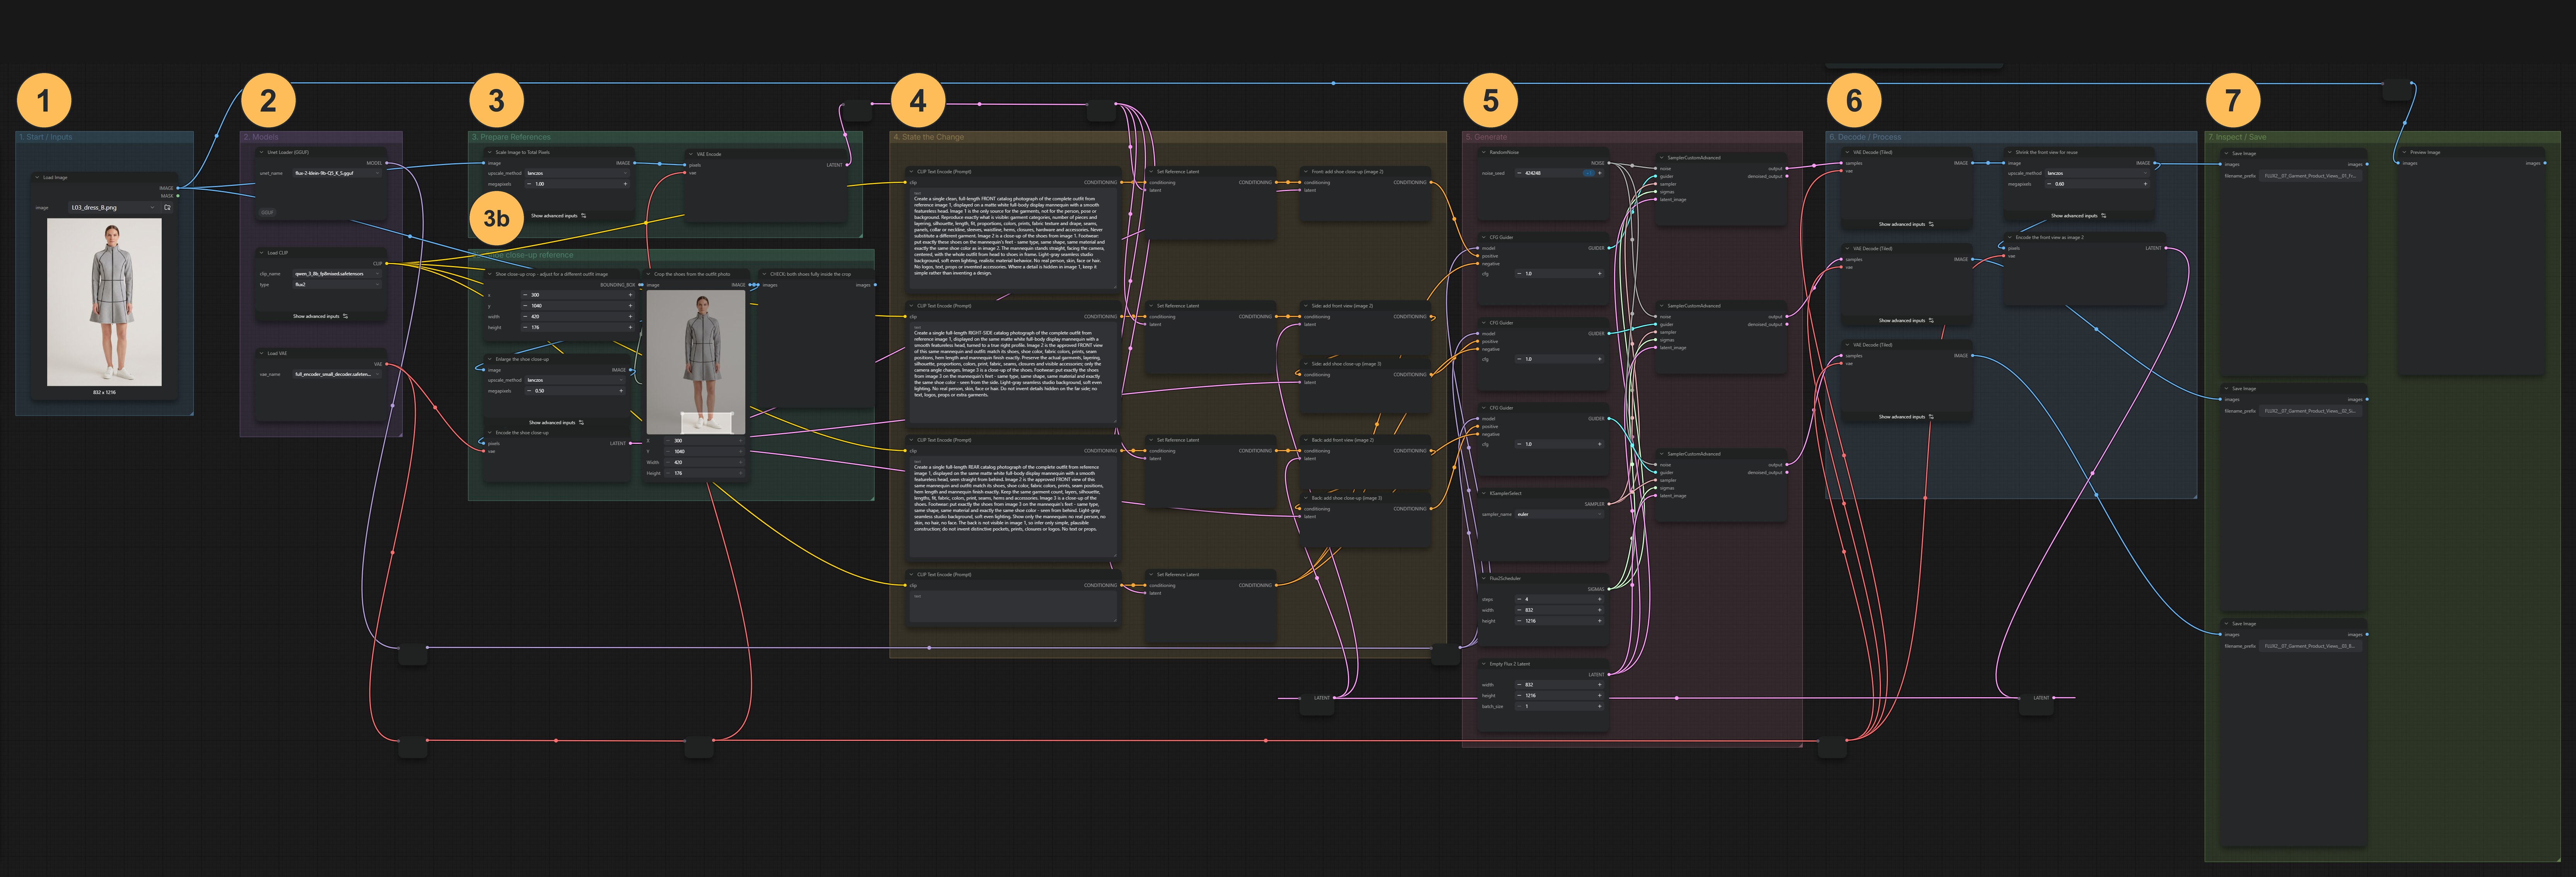
Load the approved design
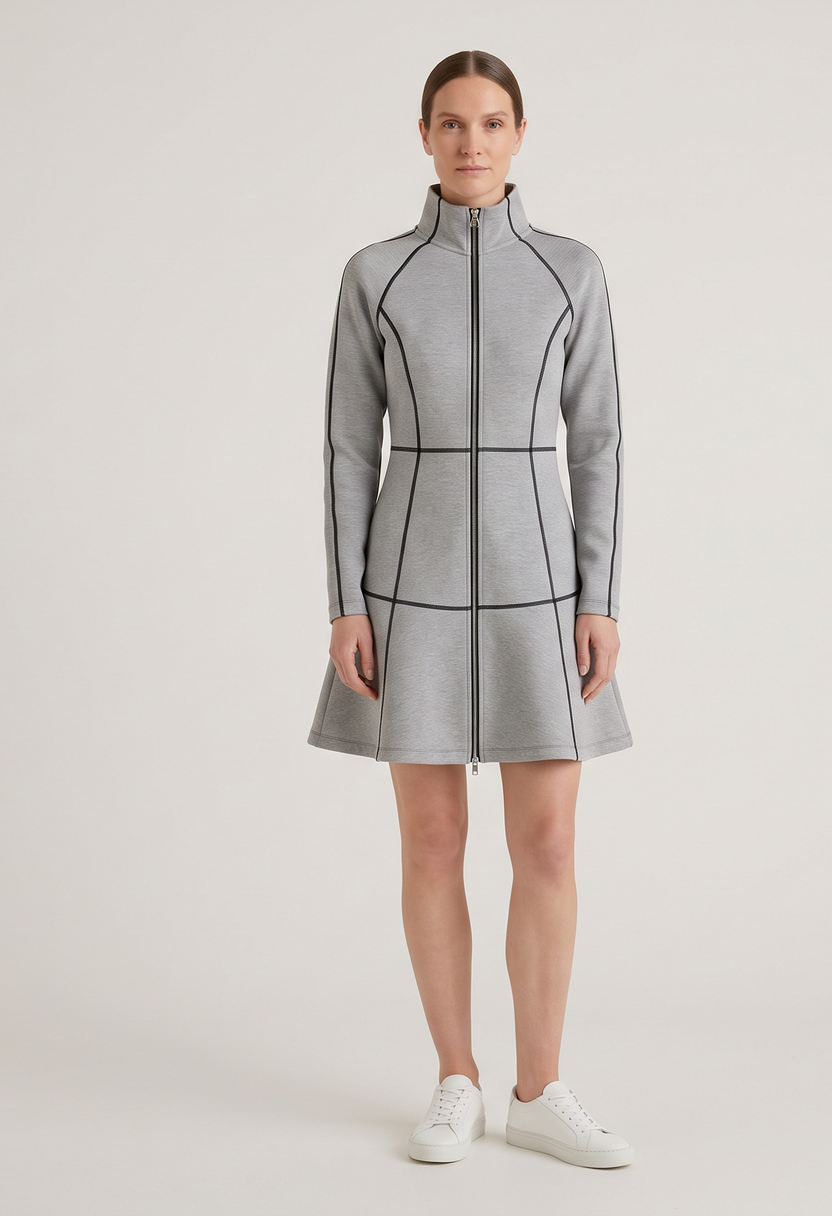
LoadImage selects the garment photo. Choose a full-length picture with readable seams, neckline, hem, silhouette and shoes, at a front or slight three-quarter angle. If the hem or shoes are cropped off, the model has nothing to copy and will invent them.
Ask for a presentation, not a redesign
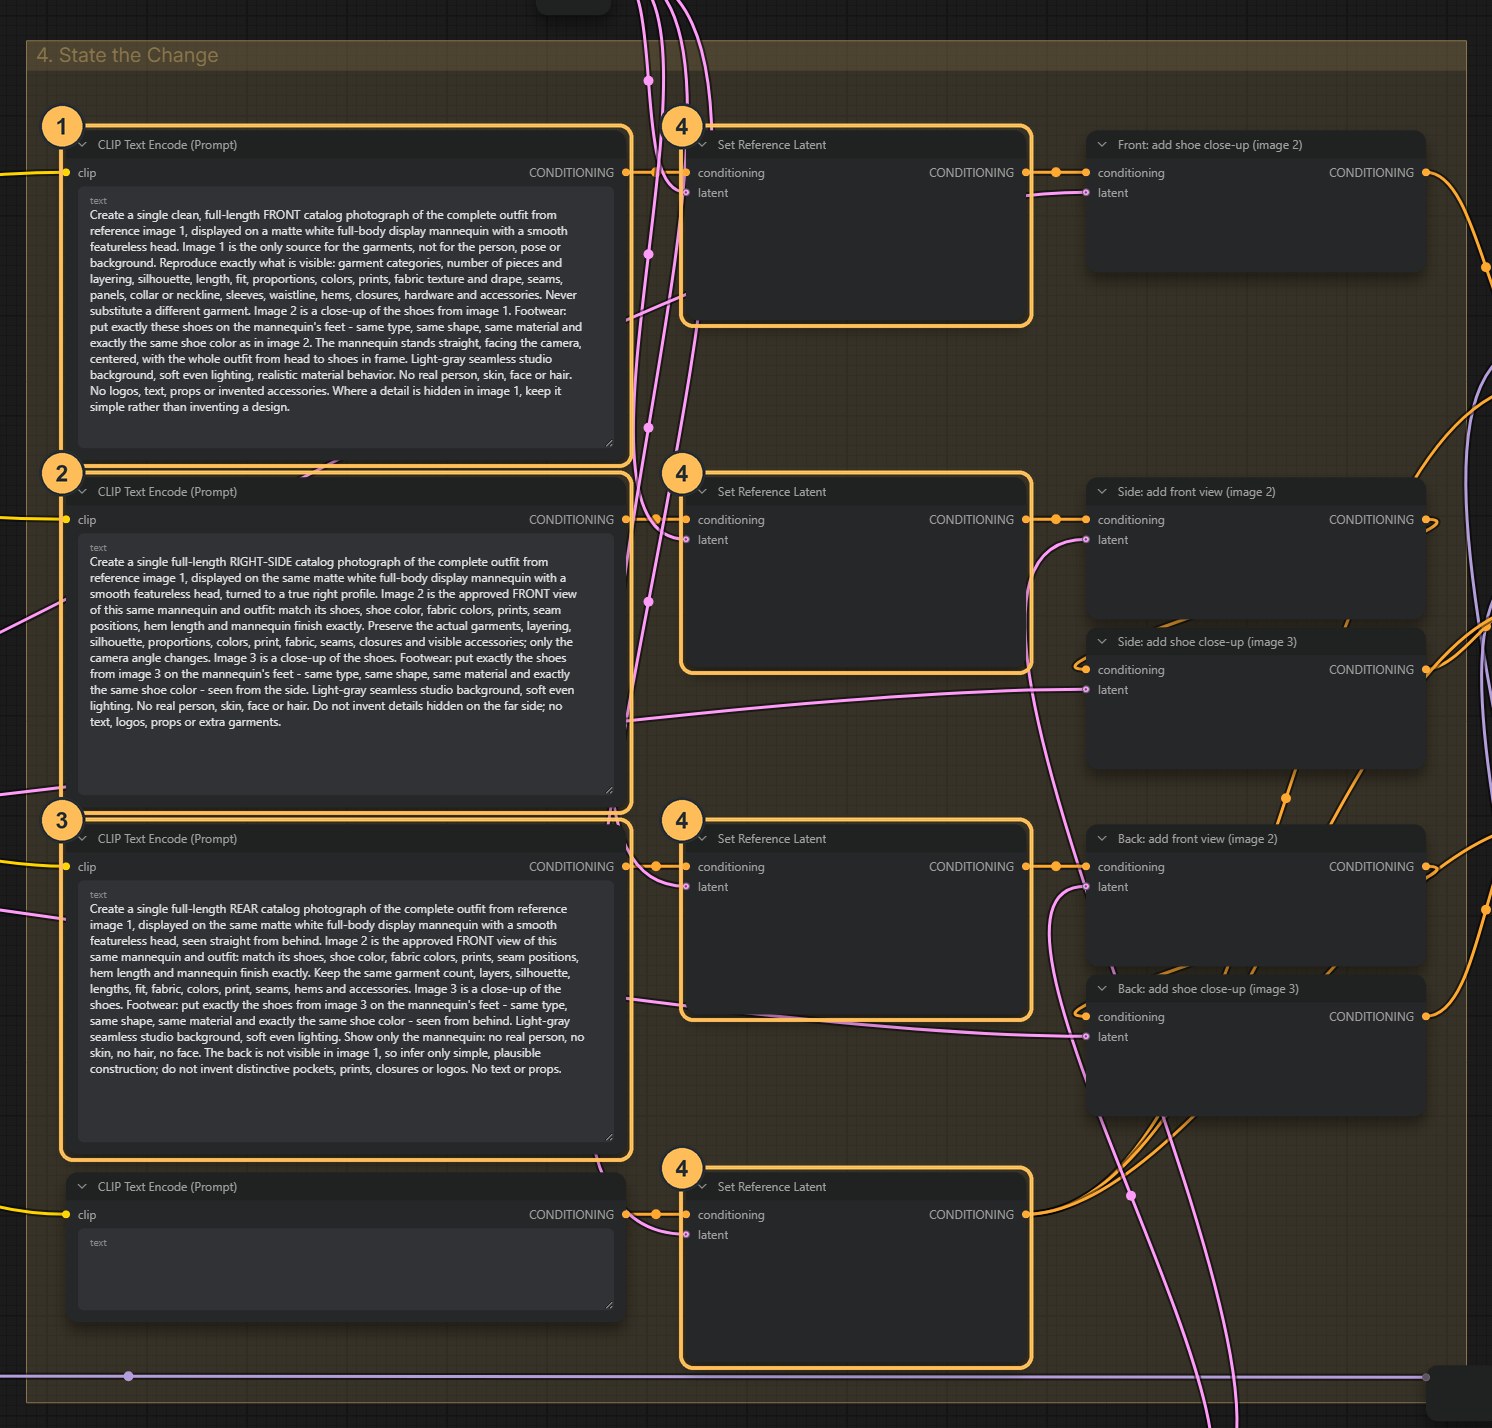
An editorial image shows a garment in a scene. A product image removes the scene so the garment can be read. The three prompts request a matte white display mannequin and a plain background, and say that image 1 is the source for the garments only, not for the person, pose or background.
The garment description is the same in all three prompts. Only the view changes: front, right side, rear. Describe materials by how they catch light. Matte cotton spreads highlights, satin makes narrow bright ones. This helps white-on-white pieces stay separate.
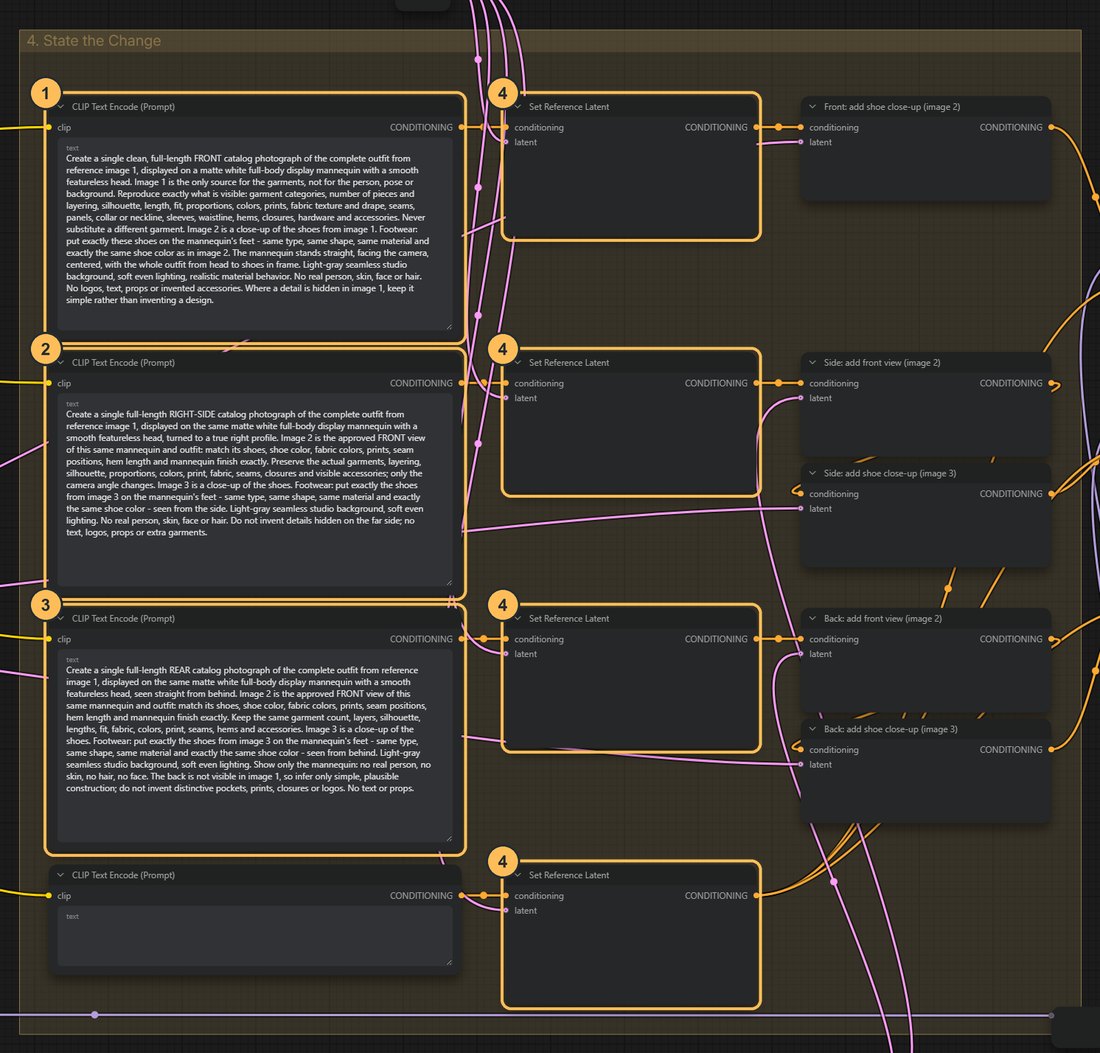
- Front prompt
- Side prompt
- Back prompt
- Reference latentAttaches the garment photo to every prompt.
Show it, and say it
The model receives both the text and the reference image, and it uses them together. A reference image is still interpreted, not copied. Small details such as shoes, piping or buttons occupy only a few pixels, and the model can misread them or replace them with something more typical.

An earlier version of this workflow, without the two techniques below: the photo shows white trainers, and the prompt says “copy the exact shoes from image 1”. In that run the shoes came back brown, grey and grey. The instruction relied entirely on the model reading a few small pixels correctly, three separate times. There are two ways to give it more to work with. One is to name the detail in words: “plain white smooth-leather low-top trainers with white soles”, written identically in all three prompts. Do the same for anything that must not change, such as fabric colour, piping or the position of a zip.
Wording like this ties the prompt to one outfit, so you have to rewrite it for every new photo. The other way is to show the detail larger, which is what this workflow does.
Two techniques that keep details consistent
If the three branches each read only the original photo, each one interprets the small details on its own. That is what produced the three different shoes above.
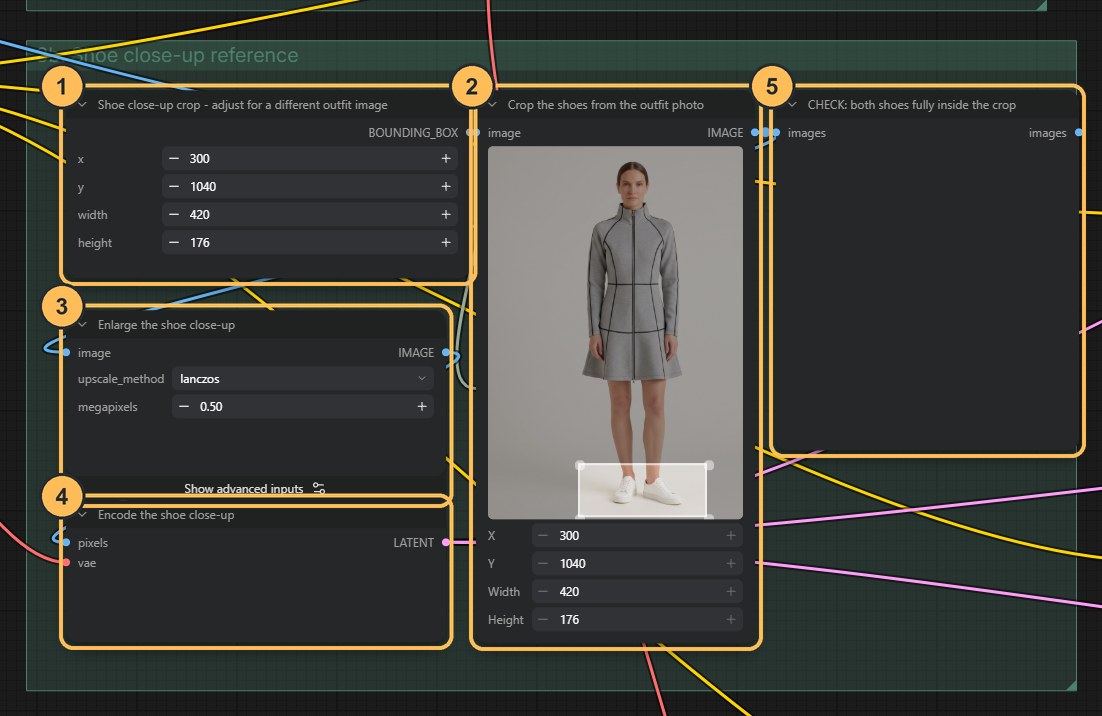
The workflow adds two things. First, a shoe close-up. A Bounding Box node marks the shoes in the garment photo, a crop node cuts that area out, and it is enlarged and attached to all three views as an extra reference. The shoes now fill a whole reference image, so the model can read their colour and shape. If you load a different photo, move the box until both shoes are inside the preview.
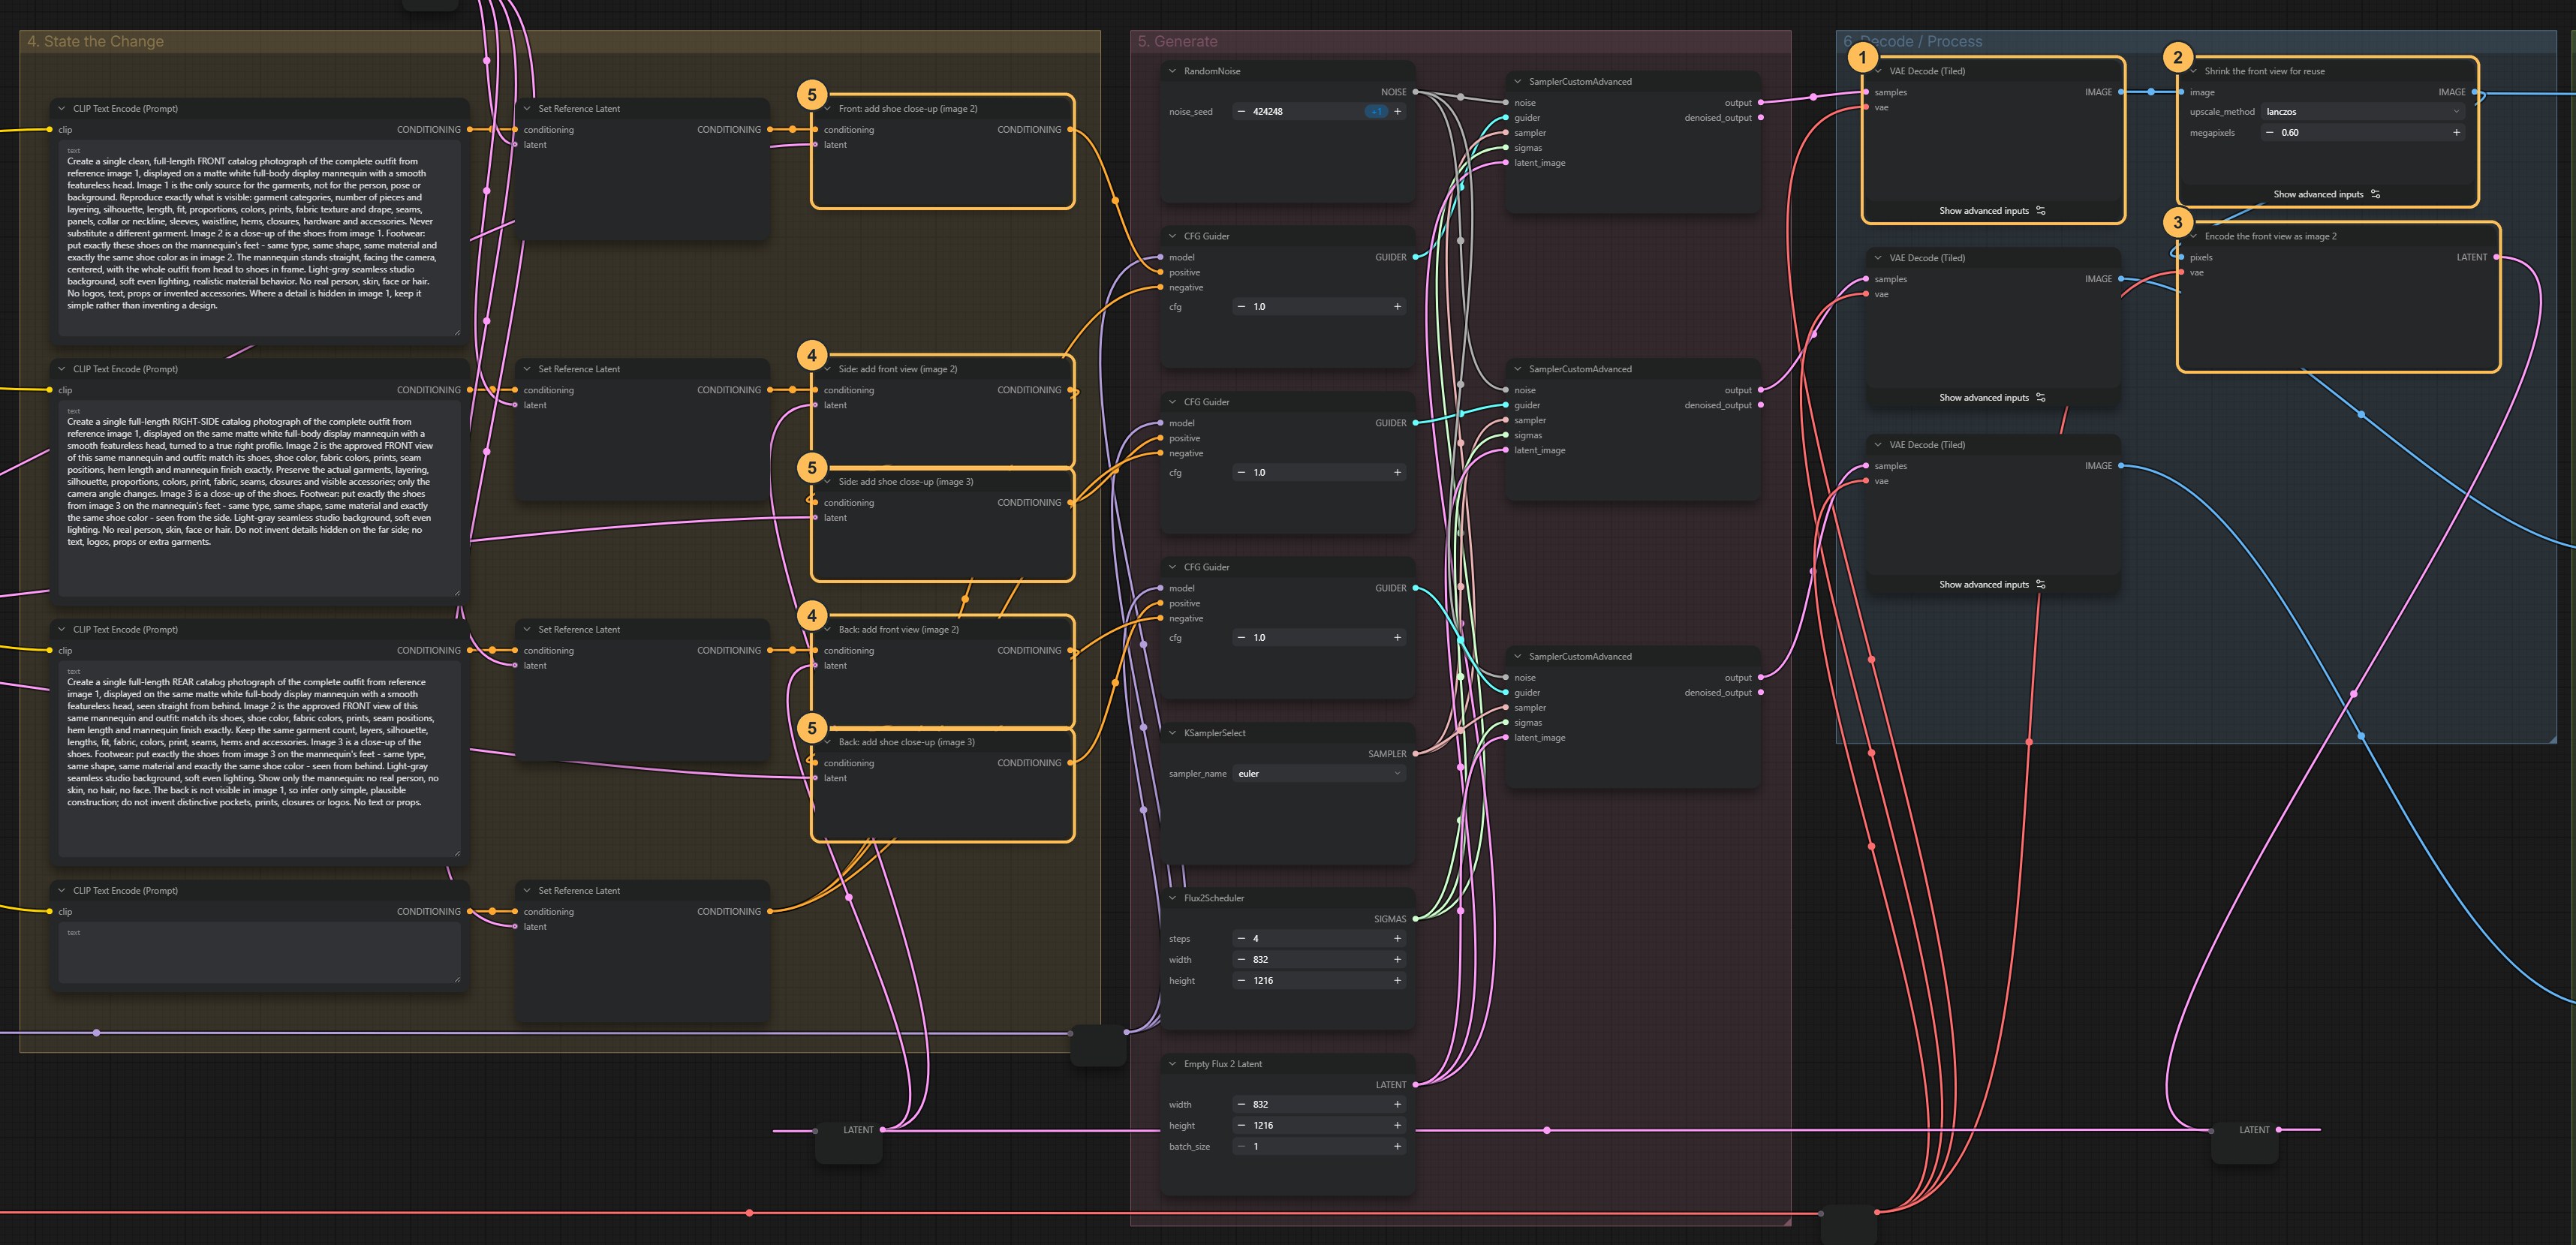
Second, the front view is reused. The front view is generated first. That finished image is then made smaller, converted into the model’s internal form and attached to the side and back branches as an additional reference, image 2. The shoe close-up is their image 3. Their prompts say: image 2 is the approved front view of this same mannequin and outfit, so match its shoes, colours, prints, seam positions, hem length and mannequin finish.

The workflow as saved, on the same photo: white trainers in all three views. The side and back now have three references: the original photo for the garment, the generated front for the details already decided, and the shoe close-up. The aim is that the three views agree with each other. Whether they do is something you check on each run. The front view can also pass on its own mistakes, so approve it before trusting the other two.
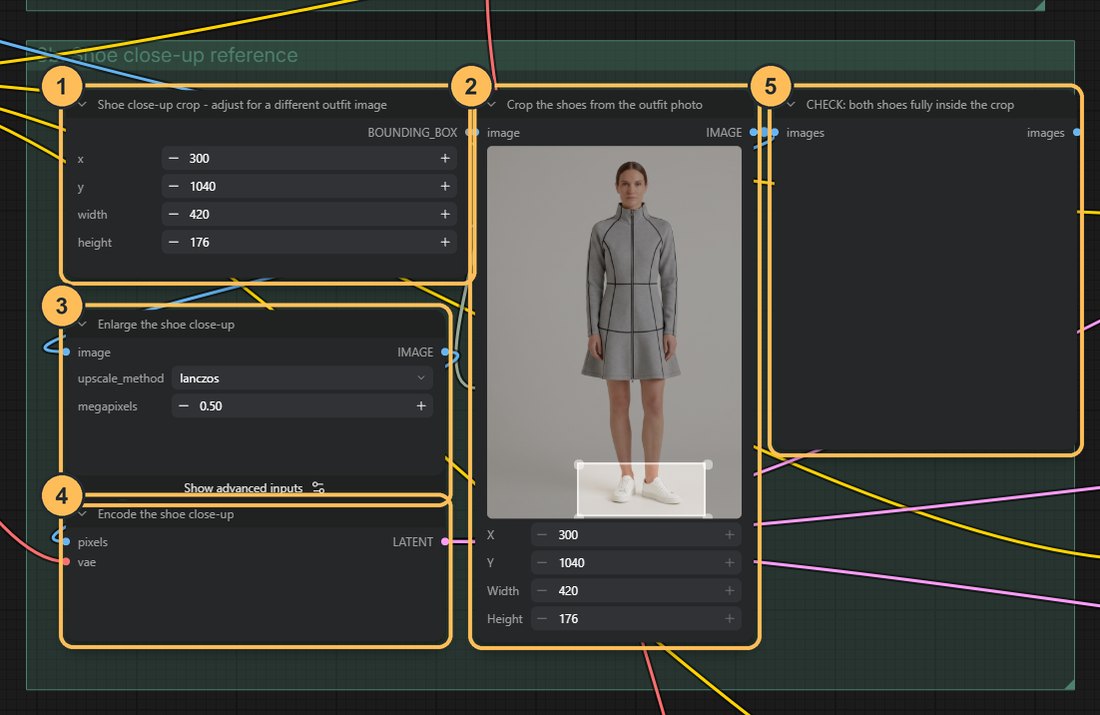
Group 3b: the shoe close-up. - Bounding boxFour numbers that mark where the shoes are in the photo.
- CropCuts that area out of the garment photo.
- EnlargeMakes the close-up big enough for the model to read.
- EncodeConverts it into a reference.
- CheckPreview of the crop. Both shoes should be inside it.
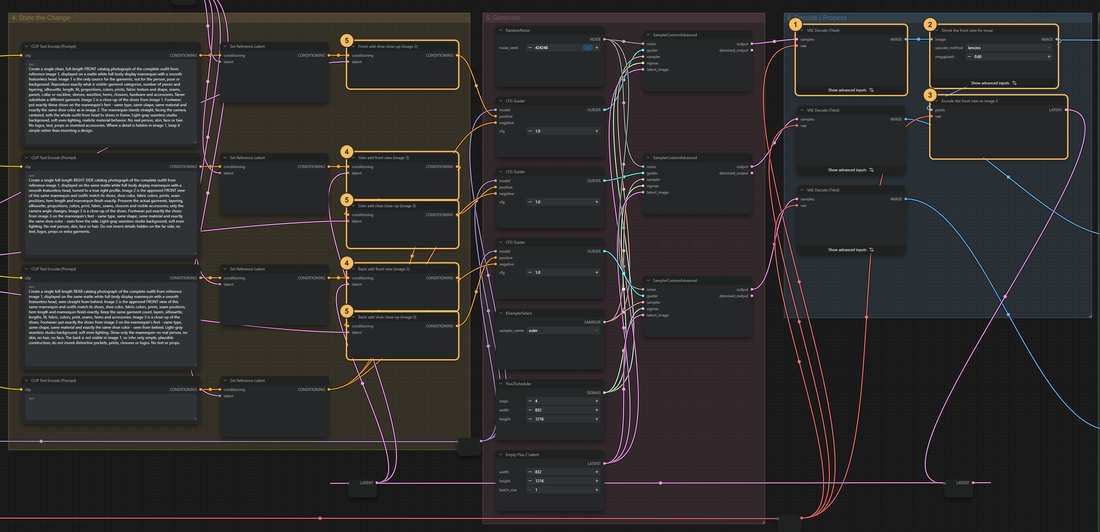
How the finished front view and the shoe close-up are attached. - Decode the front viewThe front view is finished first.
- ShrinkMakes a smaller copy of the front view.
- EncodeConverts that copy into a reference, called image 2.
- Add front viewAttaches image 2 to the side and back prompts.
- Add shoe close-upAttaches the shoe close-up to all three views.
Run and review the set together
One press of Run produces all three views, saved with
01_Front,02_Sideand03_Backin their filenames. Look at them side by side before choosing which to present. The image size is 832 × 1216 and CFG is 1. The workflow uses the recommended 4 steps.
Check the result
Consistency between views is something to evaluate, not something the workflow guarantees.
- Seam lines continue logically from one view to the next
- Hem length and silhouette are the same in all three
- Closures appear where you would expect them
- Shoes match the reference in every view, in colour as well as shape
- Mannequin finish and framing are the same
The side and back are inferred from a front photo. These are not technical flats (the measured line drawings used in production), so do not take measurements from them. A tech pack, the document a factory works from, still needs flats, measurements and approved samples.
Download the workflow
- A_Garment_Product_Views.jsonFront, side and back views, with the shoe close-up and the reused front view
- L03_dress_B.pngThe example garment photo. Put it in ComfyUI’s input folder, or load your own
Click a filename to download it, or right-click it and choose Save link as. Keep the .json ending. Then drag the file onto the ComfyUI canvas, or use Workflow → Open.